Equipment - High Frequncy Jet Ventilation
Complete post test after you read this module. Save your certificate of completion!
Important Reminder!!!!!!!!! All ventilator setting should be set according to your own hospitals policy or physician order. These are evidence based recommendations and are here for educational reasons only.
High Frequency Jet Ventilation - Overview
High-Frequency Jet Ventilation (HFJV) is an advanced mode of mechanical ventilation used in the Neonatal Intensive Care Unit (NICU) to treat critically ill infants with severe pulmonary disease. Unlike conventional ventilation, HFJV delivers very rapid, small tidal volumes via pulsed jets of gas directly into the airway, typically at rates of 240–660 breaths per minute (4–11 Hz). This allows for adequate ventilation while minimizing volutrauma, barotrauma, and atelectrauma — key contributors to neonatal lung injury.
HFJV operates as an open system, relying on active inspiration and passive exhalation, with a short inspiratory time (≤ 0.02 seconds). This strategy maintains alveolar recruitment with lower peak pressures, making it particularly valuable in neonates with delicate and immature lungs. HFJV relies on a conventional ventilator, and a pulse interrupter.
1. Indications for HFJV in Neonates
Pulmonary Interstitial Emphysema (PIE)
HFJV is the preferred ventilation mode because it allows for gas exchange with lower peak pressures,
reducing further air trapping and tissue damage.
Severe Respiratory Distress Syndrome (RDS)
In infants who have failed surfactant therapy and require high ventilator pressures on CMV.
HFJV helps improve oxygenation and CO₂ clearance while using gentler pressures.
Meconium Aspiration Syndrome (MAS)
Thick meconium obstructs airways, leading to ball-valve effect, hyperinflation, and risk of pneumothorax.
HFJV limits air trapping and supports gas exchange even with partial obstruction.
Air Leak Syndromes
Includes pneumothorax, pneumomediastinum, pneumopericardium.
HFJV reduces the need for large tidal volumes, allowing healing while maintaining ventilation.
Persistent Pulmonary Hypertension of the Newborn (PPHN)
When conventional ventilation is failing and oxygenation goals are not met.
HFJV improves oxygenation which can reduce pulmonary vascular resistance.
Congenital Diaphragmatic Hernia (CDH)
To avoid barotrauma in hypoplastic lungs while maintaining oxygenation and ventilation.
Bronchopulmonary Dysplasia (BPD) Exacerbations
In older preterm infants with evolving or established BPD who are difficult to ventilate conventionally.
Hypoventilation or Hypercapnia Unresponsive to CMV
When increasing pressures on CMV would increase lung injury risk, HFJV can remove CO₂ more effectively with less trauma.
Selective Lung Disease
When only one lung is affected (e.g., unilateral PIE or pneumonia), HFJV can ventilate the functional lung while minimizing impact on the diseased one.
2. Equipment and Circuit Setup
The most widely used neonatal jet ventilator is the Life Pulse HFJV (Bunnell Inc.). It operates in tandem with a conventional ventilator, which provides PEEP, humidification, and optional sigh breaths.
Essential Equipment:
Life Pulse Jet Ventilator Patient Box (jet valve assembly). Triple-lumen endotracheal tube adapter Conventional ventilator for PEEP and sigh
Humidifier with heated circuit Properly sized, cuffless neonatal endotracheal tube (ETT)
3. HFJV Setup for Neonates – Step-by-Step
Connect and Power the System
Plug in and power on the Life Pulse HFJV.
Perform self-test on the ventilator (per manufacturer protocol).
Confirm all gas sources (compressed air and oxygen) are connected and flowing.
Assemble the Jet Circuit
Connect the jet valve (patient box) to the ventilator.
Connect Casette to Life Pulse
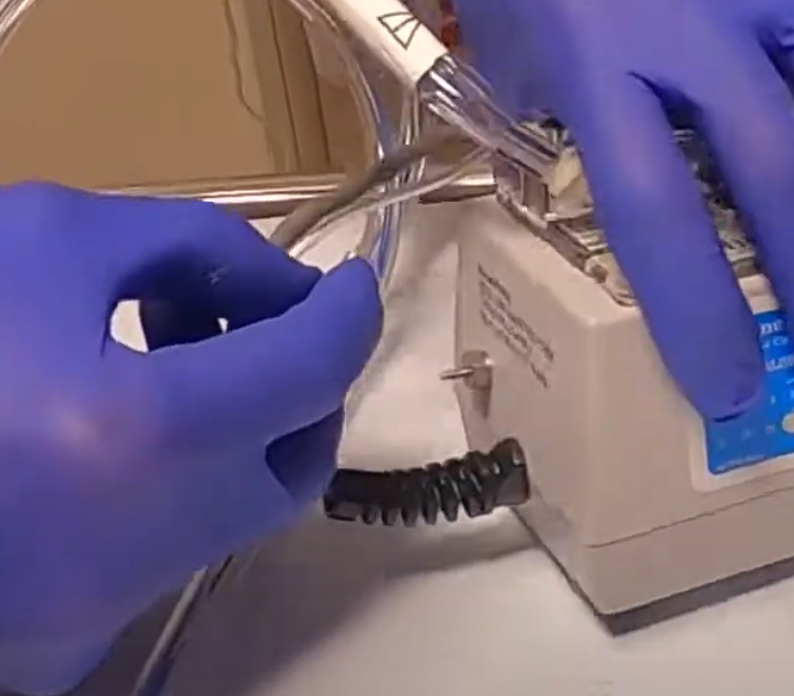
Connect Purge line and Gas Out line to Life Pulse. (Fig. 1)
Clamp humidifier line where it says water pump.
(Fig. 1)
Connect white part of circuit to Patient Box. Depress button to slide in all the way. Ensure flow is going toward the patient. (Fig. 2)
(Fig. 2)
Connect purge line to Patient Box. (Fig. 3)
f (Fig. 3)
Connect and Power the System
Plug in and power on the Life Pulse HFJV.
Perform self-test on the ventilator (per manufacturer protocol).
Confirm all gas sources (compressed air and oxygen) are connected and flowing.
Attach the triple-lumen adapter (Fig 4) to patient box and to Life Pulse Circuit. You will need to unscre the cap on the adapter to connect life pulse circuit. Tip: Do not lose the cap!
One lumen delivers jet pulses
Second lumen monitors pressure at the ETT
Third allows for conventional circuit flow (PEEP and humidity)
Ensure tight, leak-free connections.
(Fig. 4)
(Here we see the 3 lumens)
4. Set Up the Conventional Ventilator (PEEP Ventilator)
This ventilator acts only to provide PEEP and humidified gas, unless sigh breaths are needed.
Settings: All ventilator setting should be set according to your own hospitals policy or physician order!!!!!
Mode: CPAP or SIMV with rate = 0 ( unless it is determined that sigh breaths are needed)
PEEP: Initial PEEP should be 2 - 4 cm below the MAP on either CMV or HFV.
IMPORTANT POINT - After converting to the Jet, the MAP on the Jet should equal the MAP on either
the CMV or the HFV prior to conversion.
FiO₂: Adjust to keep O₂ saturations between)
Rate: 0 bpm (no breaths unless using sigh breaths)
PIP: 0 or low (if rate is set to zero)
Ensure humidification is ON and delivering warmed, saturated gas.
Sigh Breaths
All ventilator setting should be set according to your own hospitals policy or physician order!!!!!
Use for Premature Infants < 27 weeks gestation, generated by the conventional in-line ventilator:
Use as an ongoing alveolar recruitment strategy especially for “wandering”/ focal/ patchy atelectasis.
Initial rate 4 with I.T of 0.4 with PIP set at 6-10 cm above the PEEP, once initiated no need to wean the rate, however if air leaks develop then turn off sighs (rate of 0) until healed.
Can increase rate up to 6-12 for alveolar hypoventilation spells which present with significant desaturations < 80% when the infant’s own spontaneous breathing rate slows < 15-20 BPM. The use of this higher rate will decrease the depth and duration of these desaturation spells.
5. Initial Settings on the Jet Ventilator
5.Initial HFJV Settings
All ventilator setting should be set according to your own hospitals policy or physician order!!!!!
For use in premature infants < 28 weeks Gestation or < 1000 grams. Primary goal of this approach is to minimize mechanical injury from air trapping and/or hyperinflation.
Initial Rate Settings in ELBW babies
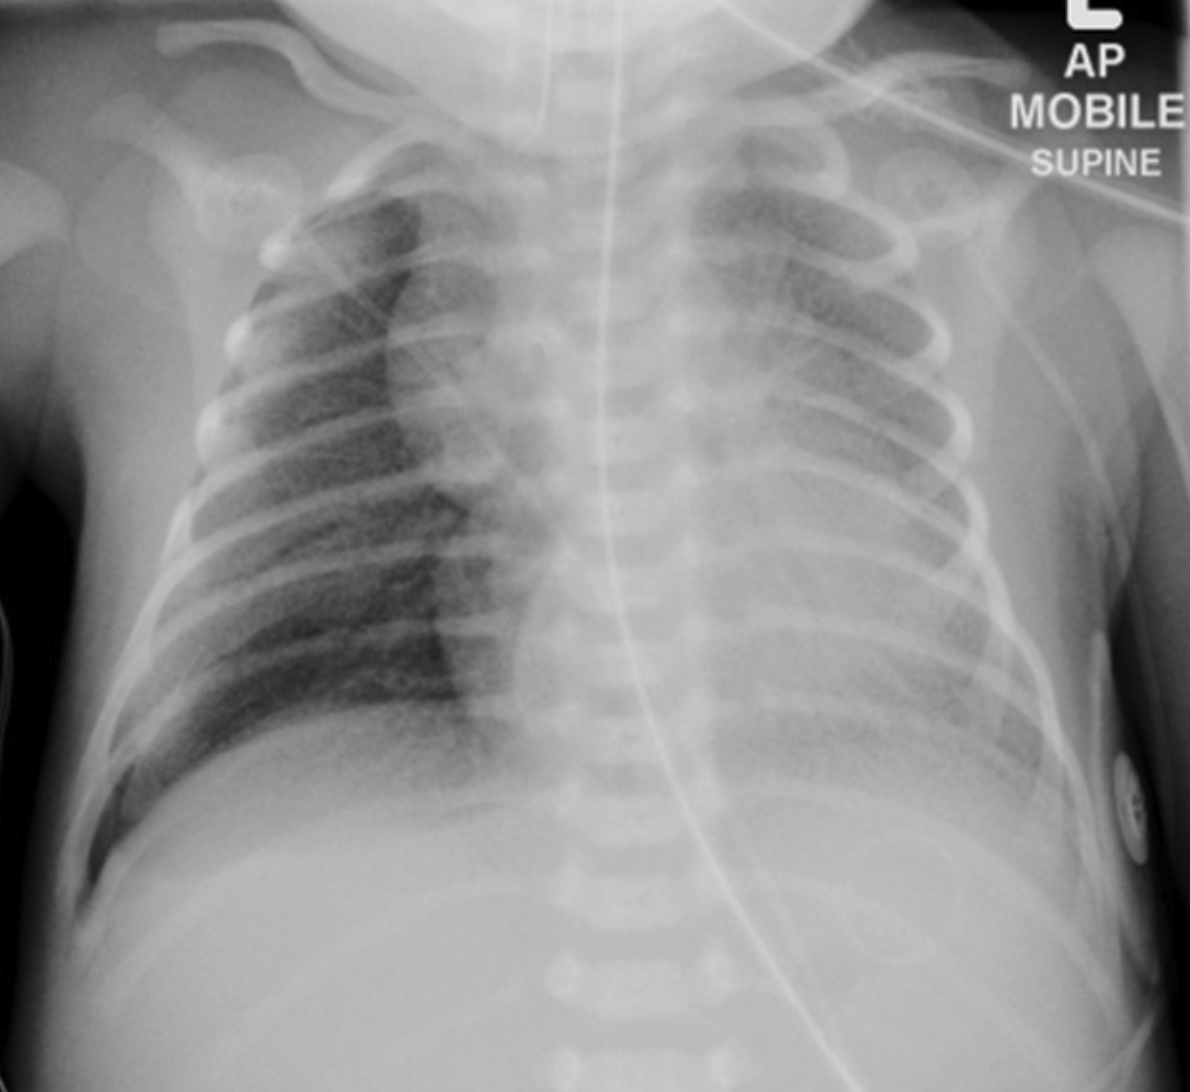
(X-Ray of neonate with PIE)
If PIE begins to develop also drop rate from 360 to 300 to 240.
I.T. leave fixed at 20 milliseconds (0.02 sec) to minimize risk of air trapping.
Initial PEEP start at 5 cm to avoid hyperinflation, can increase as needed if still poorly aerated and requiring FiO2 > 0.40 after surfactant therapy.
Initial PIP start at 22-24 cm with visible jet vibrations of the chest wall and adjust based on pCO2 goals.
1st Intention start with no sighs.
6.Rate (frequency) and inspiratory time
All ventilator setting should be set according to your own hospitals policy or physician order!!!!!
Initial Rate or Frequency - 420 BPM (7 Hz) is the usual starting frequency for infants (range of 4 - 11 Hz or 240-660 BPM). Start with a rate of 360 BPM (6 Hz) for infants < 1000 grams or < 27 weeks gestation age or when either air leaks or air trapping is a concern. Changes in rate or frequency are rarely made in the hour-to-hour management of blood gases. Frequency is ordered as rate in BPM. Changes are to be made in 60 BPM (1 Hz) increments.
I.T. - High Frequency Breath - always use 20 milliseconds (0.02 sec) for the inspiratory time (range 20-34 milliseconds). The I.T. should never be increased above 20 milliseconds (0.02 sec) without Neonatal staff approval. Any increase in I.T. will greatly increase the risk of air trapping and pneumothorax.
I:E ratio - The I:E ratio is dependent on the frequency. Higher frequencies increase the risk of gas trapping. At 20 milliseconds IT and at 11 Hz (660 BPM), the I:E ratio is 1:3.5 while at 7 Hz (420 BPM) the I:E ratio is 1:6. The longest I:E ratio is at 4 Hz (240 BPM) – 1:12.
Decreased Frequency (4 - 6 Hz) (240-360 BPM) is used:
To treat air leaks: PIE, pneumothorax.
To avoid hypocarbia from excessive ventilation when at minimum delta P (PIP-PEEP), which is a PIP of 3 - 6 cm above the PEEP.
To minimize inadvertent air trapping, which can be detected when the PEEP measured by the jet exceeds the PEEP set on the conventional ventilator by > 1.5 - 2 cm. Always monitor both PEEP values.
Increased Frequency (from 8 Hz up to 11 Hz) (480-660 BPM) is used:
To increase alveolar ventilation when the patient has severe hypercarbia despite increased PIP, when there is no evidence of air trapping.
To improve oxygenation by increasing lung volume from decreased expiratory time (i.e., shorter I:E ratio), leading to increased lung recruitment (warning: this maneuver will increase the risk of air leaks).
To decrease the delta P needed and thus minimize the delivered TV in micro-preemies when air trapping is not a concern.
7. PIP (peak inspiratory pressure)
All ventilator setting should be set according to your own hospitals policy or physician order!!!!!
The jet functions as a pressure limited ventilator. Thus, you set the PIP that you want the jet to achieve. The difference between the PIP ordered and the PEEP is the delta P, which represents the volume of gas generated by each high frequency pulse during the opening of the pinch valve (maximum generated volume occurs with a PIP of 50 cm with a minimum PEEP and an IT of 34 milliseconds). Thus, an increase in PIP will increase delta P and improve ventilation and a decrease in PIP will decrease delta P and decrease ventilation.
Tidal volume: The Vt delivered is attenuated by the following: circuit tubing, humidifier, ET tube diameter and length (FLOW is proportional to r4/L), the patient’s airways and compliance. The Vt delivered is proportional to the delta P (PIP-PEEP).
Key Concepts
Initial PIP Settings: Range (8 - 50 cm H2O)
If converting from conventional ventilation, set PIP on the HFJV to a value that is 2-4 cm > PIP on conventional ventilation. If not ventilating well set PIP on the Jet 4 > than the PIP on the conventional ventilator. If starting a patient < 27 weeks gestation on first intention HFJV to minimize volutrama then start with PIP in the low 20's, PEEP 5 and a rate of 360 (22-24 cm JET PIP) with visible jet vibrations of the chest wall and then titrate based on the PCO2 goals, oxygenation and chest radiographs.
If converting from Star HFV or 3100A HFV, then set PIP approximately 1- 2 cm below the measured PIP that is generated by the HFV amplitude, which is measured by monitoring the patient with the jet using the pressure monitoring port of the ET tube adaptor while they are still on HFV (Star or 3100A) prior to conversion. If not ventilating or oxygenating well set PIP on the Jet equal to the measured PIP generated by the amplitude of the high frequency oscillatory ventilator.
Check gases Q15-20 min, and titrate the PIP based on PaCO2 until stable (e.g., RDS - PaCO2: 45 - 60).
Alveolar Ventilation (Ve) on HFJV is proportional to the delta P, which is primarily determined by the PIP.
Management of PaCO2 (Alveolar Ventilation (Ve) on HFJV):
During HFJV, Ve =(Vt)squared x frequency as compared to CMV in which Ve = Vt x Rate
Thus, PaCO2 is primarily regulated by changes in PIP or delta P (PIP-PEEP), not rate or frequency! Delta P is primarily regulated via changes in PIP. See table below for rough guidelines on adjusting the PIP.To change PaCO2 ± 2 - 4 mm Hg adjust PIP by 1-2 cm H2O
To change PaCO2 ± 5 - 9 mm Hg adjust PIP by 3-4 cm H2O
To change PaCO2 ± 10 - 14 mm Hg adjust PIP by 5-6 cm H2O
Always check a blood gas 15-20 minutes after any change in PIP.
8.PEEP and Sigh Breaths
All ventilator setting should be set according to your own hospitals policy or physician order!!!!!
The PEEP on HFJV is set by using the conventional ventilator that is in-line with the jet. Oxygenation on HFJV is directly proportional to MAP which is similar to CMV; however, with HFJV, the MAP should be generated primarily by PEEP with a contribution from the PIP. The greater the delta P, the larger the contribution of the PIP to the MAP. During HFJV; MAP should primarily be determined by PEEP to avoid excessive use of PIP, thus minimizing barotrauma, volutrauma, and hypocarbia.
CONVERSION TO HFJV:
Initial PEEP Settings: Initial PEEP should be 2 - 4 cm below the MAP on either CMV or HFV. IMPORTANT POINT - After converting to the Jet, the MAP on the Jet should equal the MAP on either the CMV or the HFV prior to conversion. After conversion, if Jet MAP is > 2 cm above the CMV/HFV MAP before conversion, then decrease PEEP 1 cm at a time until the MAP on the jet is equal to the MAP before conversion or stop at a MAP 1 cm higher if there is a need to improve oxygenation. If starting the patient immediately on HFJV, use a PEEP of 8 cm and then titrate based on X-ray findings and ability to oxygenate. If starting the patient immediately on HFJV, use a PEEP of 5-6 cm and then titrate based on X-ray findings and ability to oxygenate.
Initial PIP: If converting from Star HFV or 3100A HFV, then set PIP 1- 2 cm below the measured PIP that is generated by the HFV amplitude, which can be measured by monitoring the patient with the jet while they are still on HFV (Star or 3100A) prior to conversion. If converting from conventional ventilation, set PIP on the HFJV to a value that is 2 cm < PIP on conventional ventilation.
Sigh Breaths: When converting from CMV to HFJV, place the Jet in-line with the patient remaining on their conventional settings and then activate the Jet settings (420 bpm, 0.02 sec IT, PIP as previously determined), then increase PEEP by 1 cm while decreasing both conventional rate by 5 bpm and conventional PIP by 2 cm H2O on the conventional ventilator in order to keep MAP constant during the conversion. Keep decreasing rate quickly and increasing PEEP while decreasing conventional PIP until rate of CMV is 3- 4 bpm (sighs) and MAP becomes equal to PEEP. Or in stable patients, just switch the patient directly from conventional ventilation to the previously determined Jet settings After conversion, the PIP of the conventional sigh breaths should be about 6 cm above the PEEP.
It is very important to keep MAP constant during the conversion to HFJV to avoid excessive atelectasis and concomitant loss of oxygenation.
Obtain a CXR 45-60 min after converting to the jet. Follow CXR closely to assess for appropriate lung volume (around 9 ribs)
Gases: Check a gas within 15-20 min after converting to the jet and adjust appropriately.
9. Management of ABGs - Oxygenation and Ventilation: Oxygenation is directly proportional to PEEP and MAP – see multiple scenarios below:
All ventilator setting should be set according to your own hospitals policy or physician order!!!!!
Oxygenation Inadequate - If below optimal lung volume and if FiO2 0.6 - 0.7, increase PEEP by 1 - 2 cm H2O. If FiO2 is 1.0, increase by 2 - 4 cm H2. When increasing PEEP, also increase the PIP by the same amount to keep tidal volume constant. Can also increase the PIP, IT or rate of the sigh breaths to improve alveolar recruitment.
Oxygenation Inadequate and CO2 Adequate - If CO2 is acceptable but not oxygenating, increase MAP but keep TV or delta P constant. Thus, when increasing PEEP, also increase the PIP by the same amount (1 and 1 cm H2O or 2 and 2 cm H2O for both PIP and PEEP).
Oxygenation Inadequate and CO2 Too Low – Increase PEEP (1-2 cm) but keep PIP constant. This increases MAP,
while decreasing the delta P, thus improving oxygenation while decreasing the TV.
Oxygenation Inadequate and CO2 Too High – Increase both MAP and delta P by increasing PIP until CO2 is acceptable.
If the oxygenation is still inadequate with an acceptable CO2, then increase both PIP and PEEP by the same amount to keep TV constant.
Oxygenation Too Good and CO2 Too Low – Decrease PIP until CO2 is appropriate. If oxygenation is still too good with an over-inflated
chest X-ray, start decreasing both PIP and PEEP by the same amount to decrease MAP while keeping a constant delta P.
Oxygenation Adequate and CO2 Too Low – Wean delta P by decreasing PIP but increase PEEP as necessary to keep MAP constant.
This decreases TV but keeps MAP constant, thus preventing atelectasis with loss of oxygenation.
Oxygenation Too Good and CO2 Adequate — If CO2 is acceptable but FiO2 is too low or CXR over-inflated, then wean MAP by keeping TV (delta P) constant by decreasing both PIP and PEEP by the same amount (1 and 1 cm H2O or 2 and 2 cm H2O).
Sigh Breaths - Conventional IMV breaths used for recruitment of alveoli to improve oxygenation without need for excessive PEEP. Normal settings: Rate = 3 - 4, I.T. = 0.4 - 0.6 sec., PIP = PEEP + 6 cm H2O (minimal adequate PIP). If sigh PIP is higher than jet PIP, then jet will pause. If sigh PIP is less than jet PIP, then jet breaths will be superimposed over IMV breath.
Warning: Oxygenation is directly proportional to PEEP (MAP) unless lung is over-inflated. If the lung is over-inflated, may need to decrease PEEP to improve oxygenation and ventilation.
( Neonatal RDS X-Ray)
10.Management strategies
All ventilator setting should be set according to your own hospitals policy or physician order!!!!!
Always place Jet on standby to suction or to give surfactant.
RDS
Surfactant Replacement Therapy - Give surfactant then switch to HFJV.
If already on to HFJV place jet on standby and then bag in the surfactant.
Wean delta P by decreasing PIP to keep PaCO2 45 - 60 mm Hg.
Wean FiO2 until ≤ 0.50 then decrease MAP by decreasing PEEP and PIP as necessary.
The lower the FiO2, the more frequently the PEEP and PIP need to be weaned to avoid
over-inflation. Minimal PEEP 3 - 6 cm H2O with FiO2 ≤ 0.40 and appropriate lung inflation on CXR.
Airleaks: Pulmonary interstitial emphysema (PIE) or pneumothorax
Minimize the number and intensity of IMV breaths. Thus, decrease sigh rate to 3 or use no sighs by setting the IMV rate to 0.
Permissive Hypercarbia - Decrease delta P to keep PaCO2 55 - 70 mm Hg, by decreasing PIP.
Decrease Rate (Frequency) - Because of the fixed I.T. (0.02 sec) decreasing the frequency will increase the expiratory time, thus minimizing air trapping (e.g., 7 Hz (420 BPM) - I:E ratio = 1:6, 6 Hz (360 BPM) - I:E ratio = 1:7, 4 Hz (240 BPM) - I:E ratio= 1:12).
Decrease MAP by decreasing both PIP and PEEP — Transiently tolerate increased FiO2 requirements (0.5 - 0.75) in order to heal severe PIE.
BPD
The goal is to minimize barotrauma, volutrauma, atelectatrauma, biotrauma, and oxygen toxicity.
Minimize delta P by decreasing PIP to keep PaCO2 adequate (e.g., 50 - 70 mm Hg).
Increase PEEP as necessary to keep FiO2 ≤ 0.40 - 0.50 with minimum PIP and allow the patient to “self-wean by outgrowing the ventilator.”
Decrease PIP and PEEP by 1 cm H2O every 3-7 days once FiO2 remains < 0.40 - 0.45 after each change.
11. Weaning
All ventilator setting should be set according to your own hospitals policy or physician order!!!!!
Oxygenation
Once oxygenation is adequate and the patient is ready to be weaned, follow these steps:
Only wean FiO2 until ≤ 0.50, unless over-inflated.
Once FiO2 ≤ 0.50 and CO2 are acceptable, decrease PEEP and PIP by 1 cm H2O Q4 - 8h, if FiO2 ≤ 0.30 - 0.35, decrease PEEP and PIP by 1 - 2 cm H2O Q2 - 4h to avoid over-inflation.
Also decrease PIP of conventional sigh breaths at the same time and by the same amount that you decrease the PEEP (e.g., PIP 16 and PEEP 10 to PIP 15 and PEEP 9).
Minimal PEEP or MAP ranges from 3 - 7 cm H2O with FiO2 ≤ 0.40. Minimal Jet PIP < 20 cm H2O. At this point one can convert to IMV at low rates (15 - 20 BPM), or remain on HFJV while the patient matures (anti-apnea settings) and grows, or extubate to NPCPAP if ready.
Ventilation
Reduce Jet PIP (delta P) at least 1-2 cm H2O per change whenever PaCO2 decreases below threshold, until minimal PIP (< 20) is reached, with a delta P < 10.
If PaCO2 is still too low (< 35 mm Hg) on minimal PIP and minimal delta P (3 cm), and if the infant is not ready for extubation, decrease frequency to 5 Hz (300 bpm) and then to 4 Hz (240 bpm) to decrease alveolar ventilation.
Extubation
Patients are usually ready for a trial of extubation with NPCPAP when they meet the following respiratory support criteria:
RDS: PEEP or MAP ≤ 7 - 8 cm H2O with FiO2 ≤ 0.35 and Jet PIP (< 20 and delta P < 10). Extubate to a NPCPAP of 6 - 8 cm H2O.
BPD: PEEP or MAP ≤ 10 - 12 cm H2O with FiO2 ≤ 0.45 and Jet PIP (< 20-22 and delta P < 10-12) extubate to a NPCPAP of 8 - 10 cm H2O.
12.Complications associated with HFJV
All ventilator setting should be set according to your own hospitals policy or physician order!!!!!
ATELECTASIS – increase the PEEP, or increase the PIP, I.T., or the rate of the sigh breaths from 3 - 6.
HYPOTENSION- decrease PEEP and PIP to decrease MAP, or decrease frequency to minimize air trapping.
OVERINFLATION- decrease PEEP and PIP, or decrease frequency.
APNEA- Increase delta P (PIP), increase sighs to 4 – 6 BPM, or consider converting to conventional
ventilation. HFJV is not an optimal mode for the management of apnea.
13.Alarms
All ventilator setting should be set according to your own hospitals policy or physician order!!!!!
Servo Pressure – Represents the amount of gas flow or tidal volume delivered by the ventilator to achieve the PIP ordered. Maximum servo pressure is 22 PSI.
Increase in servo pressure – Causes: Compliance has improved, thus a larger TV is being delivered for the same PIP. Check a blood gas and prepare to wean since the patient is improving, or there may be a leak around the ETT (common in premature infants) or a leak in the circuit requiring an increase in flow to compensate (check circuit).
Decrease in servo pressure – Causes: Plugged or obstructed tube, pneumothorax, right main stem intubation, or worsening lung disease. This worsening of compliance means that it takes very little TV or flow to reach the set PIP. Patient may need suctioning or chest x-ray.